
[ Program Manual | User's Guide | Data Files | Databases ]
Overview
Working with Programs
Starting Programs
Running Programs in the Background
Answering Program Prompts
Stopping Programs
Using Program Parameters
Rules for Using Command-Line Parameters
Customizing Program Analysis
Using Program Parameters
Displaying a Summary of Program Parameters
Using Global Parameters
Using Global Switches
Using Command-Line Control
Suppressing Program Prompts
Working with Text Output Files
Redirecting Program Output to a Device
Directing Output to a File
Directing Output to Your Screen
Directing Output to a Printer
Printing Text Output Files
Using the Batch Queue
Submitting Jobs to the Batch Queue
Checking If Your Batch Job Completed
Deleting a Batch Job
Troubleshooting a Failed Batch Job
Customizing Batch
For Advanced Users
Redirecting Output to Another Program
Using Command-Line Initialization Files
Creating a Command-Line Initialization File
Using a Command-Line Initialization File
Using Aliases
Defining Aliases
Using Aliases
Working with Shell Scripts
Creating a Shell Script
Using a Shell Script
This chapter teaches you the basics of working with Wisconsin Package programs. It provides information that you must know to take advantage of and effectively use the many options the Package offers. For information about specific programs, refer to the Program Manual or online help.
In this chapter, you'll learn how to
Note: For a list of functionally grouped programs in the Wisconsin Package and their descriptions, see Appendix A, Short Descriptions.
This section teaches you how to
If you have not initialized the Package, or you are not sure if the Package is initialized, type % gcg (or the command used at your site to initialize the Wisconsin Package). Some sites set up users' logins to automatically initialize the Wisconsin Package. When the Package is initialized, the Wisconsin Package banner scrolls on your screen. For more information, see "Initializing the Package" in Chapter 1, Getting Started.
After you become familiar with Wisconsin Package programs, you may want to customize the analysis performed by the program by adding parameters on the command line after the program name. For more information, see "Using Program Parameters" in this chapter.
Note: Wisconsin Package program commands are case sensitive. Therefore, you must type all program names in lowercase.
You can run programs in the foreground or background. When you run a program in the foreground, you are not able to use your computer until the program is done running. However, when you run a program in the background, the program runs as normal, but your terminal is free to do other work. You can run any Wisconsin Package program in the background. For a more general explanation of running programs in the background, see "Controlling Program Execution" in Chapter 1, Getting Started.
Add an ampersand (&) to the end of a GCG command line. You must use command-line control to suppress the program's interactive prompts. Use the -Default parameter and redirect standard output to a file. For example
When the program is done running in the background, you will receive a message telling you so. For example
[1] Done (set noglob; $GCGUTILDIR/stringsearch ...)
If the command line becomes too long or complicated, you may want to type the GCG commands into a shell script and run the shell script in the background. For more information, see "Working with Shell Scripts" in the "For Advanced Users" section of this chapter.
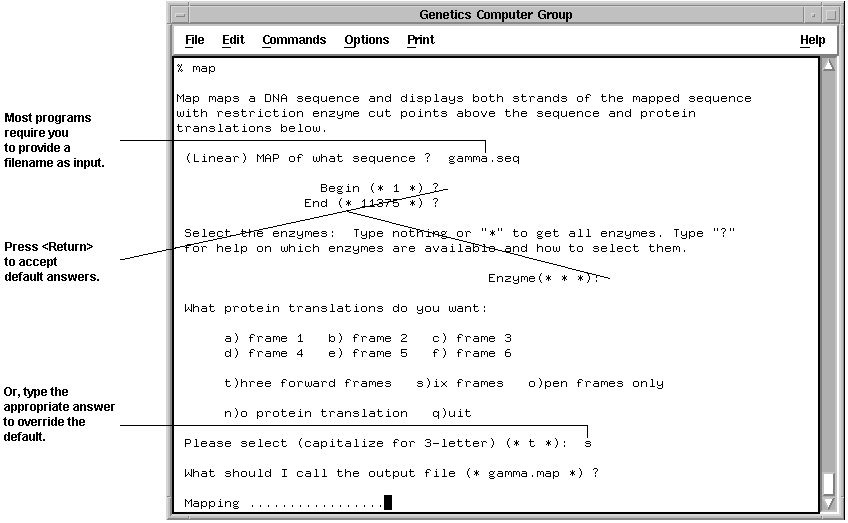
Most programs in the Wisconsin Package prompt you for information: they usually require a sequence for input, a name for an output file, the beginning and ending positions of the portion of sequence you want to use, and other pieces of information particular to individual programs.
You can answer most program prompts with a yes or no, a number, a letter, or a filename. Some prompts display several alternatives for you to choose from. The following example displays some of the various types of prompts.
When appropriate, Wisconsin Package programs supply default answers for program prompts. You can accept the default answer or type a different response. The default answer is always displayed between parentheses and asterisks. In the example above, default answers are provided for many of the prompts, for example Begin (* 1 *), End (* 11375 *), Enzyme (* * *), (* t *), and (* gamma.map *).
Choose from the following.
Note: If you press <Return> without typing an answer in response to a prompt which does not have a default, the program will stop.
Choose from the following.
To bring the suspended job to the foreground where you can work with it again, type % fg %job_number, for example % fg %6. If you cannot remember what programs you suspended, type % jobs to list the jobs and job numbers.
So far in this chapter you've learned how to start programs and interactively answer their prompts. This section teaches you how to use program parameters, or modifiers of the program command. Using parameters, you can bypass interactive prompts or use additional optional parameters to change the way programs analyze your data or display the analysis results.
This section teaches you
You let the computer know what parameters you want to use by typing them on the command line after the program name. The command line is what you type after the system prompt (%) to run a program or command. You have a number of options for running programs from the command line. If you are a new user, you may want to type just the program name, without any parameters, and respond to the program prompts. Once you become more familiar with the Package, you will probably also type one or more required or optional parameters to customize your analysis. Or you might want to bypass the program's prompts by just typing the program's minimal syntax.
You do not need to use parameters; each program performs a standard analysis if you simply type the program name and answer the program prompts. Using parameters, however, gives you more control over a program and lets you customize your analysis.
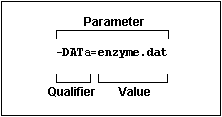
Parameters modify the action of the command. Some parameters accept values. Consider the following example:
All qualifiers are preceded by a dash (-). Some, though not all, qualifiers accept values, which modify the qualifier. Do not insert spaces in between a qualifier and its value.
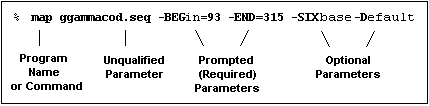
Command lines have a special syntax. Below is an example of the syntax used within the Wisconsin Package:
Program Name or Command. The Wisconsin Package program or UNIX command you want to run.
Unqualified Parameter. An unqualified parameter is a value specified without a qualifier. You can specify input and output filenames without qualifiers, as in the example above, where ggammacod.seq is an input file. You can use the command-line qualifiers -INfile= or -OUTfile= to specify input and output files, respectively. Consider the following example:
% map -INfile=ggammacod.seq -OUTfile=ggammacod.map -Default
% map ggammacod.seq ggammacod.map -Default
Notice that the first command line uses qualifiers for the input and output files and the second does not. Both, however, perform the same action; that is, they both use ggammacod.seq as the input file and to write the output into a file named ggammacod.map.
The order in which unqualified parameters appear on the command line is significant to how the program interprets them. Always provide input filename(s) first, followed by output filename(s).
Note: In those cases where you can type an unqualified parameter, the documentation displays the optional qualifier in brackets (for example [-INfile1=]). Do not type the brackets.
Because command lines have a special syntax, there are a number of guidelines you should keep in mind as you work with them:
% map -INfile=ggammacod.seq -Default
is the same as
% map ggammacod.seq -Default
Wisconsin Package programs offer flexibility in customizing your analyses by allowing you to modify the way a program processes your sequence information. Each program supports a number of parameters, or modifiers of the command. These parameters change the way the programs analyze your data.
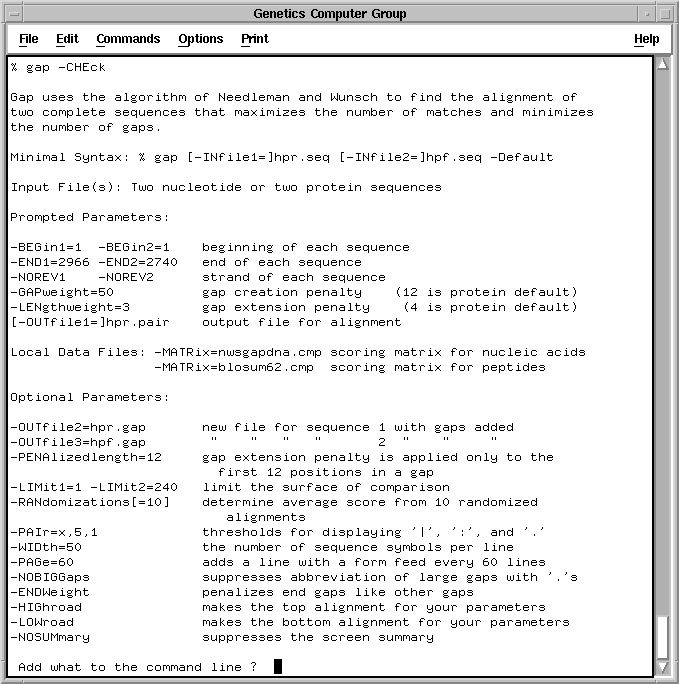
Most Wisconsin Package programs provide you with a summary of the available command-line parameters. Each command-line summary is subdivided by the following headings: Minimal Syntax, Input File(s), Prompted Parameters, Local Data Files, and Optional Parameters. Consider the following command-line summary for the Gap program:
Minimal Syntax. Shows the minimal command line you can type to suppress the program prompts and all interaction by you. The minimal command line sets the essential parameters, that is those for which the program has no default value and without which it cannot run. A default value is one that a program uses if you do not supply one. Most programs prompt you for an input file or sequence for which there is no default value.
Prompted Parameters. Shows all parameters not included on the Minimal Syntax line that are required by the program to run. You can bypass these parameters by using the -Default parameter, which tells the program to use defaults for those parameters that have them. If you do not supply the required parameters or if you do not use -Default on the command line, the program will prompt you for them.
Local Data Files. Lists the local data files the program uses by default. Local data files are non-sequence data files containing information such as restriction enzyme names and recognition sites. You can change the local data files a program uses to tailor your analyses. Alternative data files for some programs are available; for many programs you can create your own data files as well. For more information, see Chapter 4, Using Data Files.
Optional Parameters. Lists additional parameters you may want to include on the command line to customize your analyses. Optional parameters offer you flexibility in manipulating a program. However, they are not required for the program to function.
Note: You can set optional parameters only from the command line; the program does not prompt you for them.
Type -qualifier=value on the command line following the program name, for example % map -INfile=ggammacod.seq -Default. You can include as many parameters on the command line as you need to run your analysis.
To extend long commands onto a second line, type a slash (/) at the end of the preceding line, press <Return>, and continue typing the rest of the command line.
For more information, see "Rules for Using Command-Line Parameters" in this section.
You can find a summary of each program's available command-line parameters either in the Program Manual or in the Command-Line Summary. However, an easier way to see the parameters that are available for a particular program is to display them online when you run the program.
Choose from the following.
-CHEck is a global parameter (see "Using Global Parameters" in this section).
ComCheck is a global switch (see "Using Global Switches" in this section). Once you set a global switch, it stays set until you log out of the system. To turn off the ComCheck global switch, type % nocomcheck.
You can find parameters specific to each program fully described in the "Optional Parameters" topic in the entry for each program in the Program Manual. In addition, there are a number of parameters that are global within the Package; that is, they can be used by all Wisconsin Package programs. To avoid repetition, these optional global parameters are not displayed in the "Command Line Summary" in the online or printed documentation.
A separate set of global parameters are also available when you run graphics programs. For more information, see "Graphic Global Parameters" in Chapter 5, Using Graphics.
Add them to the command line just as you would a program parameter, for example % map gamma.seq -CHEck.
| Global Parameters | Description |
| -CHEck | Prints a summary of the available command-line parameters and prompts you for any additions you may want to make to the command line. |
| -Default | Tells the program to suppress all interaction and to use the program's default values for every parameter that is not explicitly defined on the command line. |
| -DOCLines=6 | Sets the number of lines of documentation that Wisconsin Package programs copy from input files to output files. This option sets a program to copy any number of lines you choose. The default is six lines. |
| -FASTA | Sets a program to accept sequences in FastA format. |
| -FAITHful | Sets a program to copy all of the input file's documentary heading, including blank lines, into output files. |
| -INITialize=initialization_file.init | Names the file the program should use as a command-line initialization file (see "Using Command-Line Initialization Files" in the "For Advanced Users" section in Chapter 3 of the User's Guide). If you do not specify the initialization_file.init, the program will use the file with a name the same as the program and the file extension .Init, for example % map -INIT uses the file Map.Init. |
| -NODOCumentation | Suppresses the short banner that introduces each program. |
| -QUIet | Sets a program not to ring the terminal bell, even when an error occurs. |
| -STAden | Sets a program to accept sequences in Staden format. |
Note: You can specify many of the above options to be in effect for an entire session using global switches. For more information, see the "Using Global Switches" topic below.
Global switches change the behavior of programs in the same way that command-line parameters do. However, unlike command-line parameters, which affect only the current program you are running, global switches affect every program you run until you log out.
You activate a global switch by typing its name on the command line, for example % comcheck. You can turn off a global switch by typing its complementary switch, for example % nocomcheck.
Note: Command-line parameters always override global switches. For example, let's say at the beginning of your current work session you set the global switch % doclines 6. You could override that global switch for a single program by adding -DOClines=10 to the command line after the program name.
TIP - If you find that you consistently use one or more global switches each time you log in, include them in your .gcgrc (csh) or .gcgrc.ksh (ksh) file.
Global switches, their descriptions, and their complementary switches are listed below.
| Global Switch | Description | Complementary Switch |
| % comcheck | Displays a summary of command-line parameters and displays the prompt "Add what to the command line?" You can type the additional parameters you want at that time. | % nocomcheck |
| % nobeep % quiet |
Turns off the bell-ringing function of all programs. | % beep % noisy |
| % nodoc % terse |
Turns off the documentation that appears when you use Wisconsin Package commands. This documentation may be tedious if you are familiar with the programs or if your connection to the computer is slow. | % doc % verbose |
| % seqformat staden % seqformat fasta |
Sets your programs to accept sequences from files in Staden or FastA format. | % seqformat gcg |
| % doclines 10 | Sets the number of lines of documentation that Wisconsin Package programs copy from input files into output files. The default number of non-blank lines copied is six. | % doclines 6 |
| % modifybatch | Lets you define the time at which programs that accept the -BATch parameter are submitted to the batch queue. | % modifybatch |
| % noplotcheck | Turns off the report of your current graphics configuration that appears when you run a graphics program. | % plotcheck |
| % plotterm | Sets your terminal to "NoBroadcast" so that if a plotter is attached to your terminal, it will plot without the confusion of system messages that can destroy the plot. This global switch also sets and verifies that the plotter is connected to the terminal and not some other port. | % noplotterm |
| % gif* % hpgl % png % postscript % regis % sixel % tektronix % xwindows |
Lets you define the type of graphics output device you want to use and the port to which it is connected. (See "Configuring Graphics Languages and Devices" in Appendix C, Graphics for descriptions of these devices.) | % gif* % hpgl % png % postscript % regis % sixel % tektronix % xwindows |
*The GIF graphics driver is an optional product that is sold separately from the Wisconsin Package. For more information, see "GIF (Graphics Interchange Format)" in the "Configuring Graphics Languages and Devices" section of Appendix C, Graphics.
Command-line control is based on the assumption that much of your work with the computer and the Wisconsin Package involves the repetition of similar commands. For instance, if you run the same analysis repeatedly, you may want to bypass the program's interactive prompts. To do so, you must supply all of a program's essential parameters--that is, those which the program must have to run to completion without your interaction. In addition you can specify optional parameters.
To use command-line control, include one or more parameters after a program name, supplying those necessary to suppress the program's prompts. To extend long commands onto a second line, type a backslash (\) at the end of the preceding line. Parameters must be preceded by a dash (-); do not type a space in between the dash (-) and the parameter. Many parameters require values, for example -BEGin=1 -END=1000, although not all do, for example -BATch. Values can include filenames, numbers, and character strings.
Note: Not all programs support command-line control. See the "Command Line Summary" for each program in the Program Manual. The "Minimal Syntax" line lists the minimum command line you can type to suppress all program prompts.
There may be times when you want to suppress program prompts. For instance, if you want to run a program in the background (see "Running Programs in the Background" in this chapter), you must create a shell script that includes the required command-line parameters. The parameters must answer all the program prompts and allow the shell script to run to completion without your interaction. Otherwise, the program will stop when it reaches the first unanswered prompt.
Answer all of the program's questions by using parameters on the command line. Use the following guidelines:
For example, to suppress the program prompts of the FastA program, you can type something similar to % fasta -INfile=ggammacod.seq -Default, where GGammaCod.Seq specifies the input file and -Default tells the program to accept default values for the rest of the program prompts.
If you want to change parameters, type the parameter and new value on the command line.
Note: When you use -Default without specifying an output filename, the program supplies a default name for the output file. The default name is often the name of the input sequence or file with the name of the program as the extension, for example ggammacod.fasta.
Note: If you are using a program that produces graphics output, see Chapter 5, Using Graphics.
This section teaches you how to
Programs typically direct their output to a file. However, you can redirect the output to your terminal screen or a printer. If you do so, the output is not saved in a file for future use.
Most Wisconsin Package programs write a text file with the output from the program. They ask the question "What should I call the output file?" and often provide a default filename consisting of the name of the input file with an extension of the program name. For example, if you run the program Map with the input file Gamma.Seq, the program provides Gamma.Map as the default output filename.
If you save program output to a file, you can view it on your screen or print it at any time.
Type the name of an output file in response to the program prompt "What should I call the output file?" If you are using command-line control, type -OUTfile=filename. The program writes its results into the file you named in your current directory.
In some cases output files act as input to other programs. In addition, you can edit most output files with any text editor, allowing you to customize your files for other uses. For more information about working with output files, such as how to view and edit them, see "Working with Files" in Chapter 1, Getting Started.
While almost all Wisconsin Package programs write their results into a text file, you also can direct the output to your terminal screen.
Choose from the following.
For more information about standard output and piping, see "Using Command-Line Redirection" in Chapter 1, Getting Started.
Note: When you direct output to your screen, no output file is saved. Also, note that some programs, such as Assemble, CodonFrequency, Translate, FromIG, and ToIG, do not let you direct output to your terminal screen.
Type "| lpr" (that is, double quote ("), pipe (|), lpr, double quote (")) in response to the program prompt "What should I call the output file?" If you are using command-line control, type -OUTfile=- | lpr. The program sends the output to the default printer. See your system manager for more information on how to send output directly from a program to a printer and on what printers are available to you.
Note: When you direct your program output directly from a program to the printer, no output file is saved.
All Wisconsin Package programs produce an output file of results. If the output file contains text or ASCII, you can print it using a number of utilities. If the output file contains graphics, see Chapter 5, Using Graphics.
Choose from the following.
Your system manager may need to set up the LPrint utility for you. For more information about LPrint, see the Program Manual or ask your system manager.
Note: Your terminal must support VT100-style pass-through printing. Note that ListFile does not work well with Macintosh or Windows terminal emulators.
For more information about ListFile, see the Program Manual or ask your system manager.
Most Wisconsin Package programs run in a few seconds. However, some programs, such as the database searching programs, can take several minutes to several hours to run. In such cases, you may want to run the programs in the batch queue. After you submit a program to run in the batch queue, your terminal is free for other work. Also, if your system charges for resources, it often will cost less to run programs in the batch queue.
Note: The batch queue is sometimes referred to as the at queue or script-execution queue in other UNIX documentation.
This section teaches you how to
The batch queue is a list of batch jobs waiting to execute. When you submit a job to the batch queue, it is scheduled to run at a later time.
When you submit a job to batch, you are telling the system to run the command for you as a separate process and at a later time. While the program you submitted is either running in the background or waiting to run, your terminal is free to work on other jobs. Or, you even can log off the computer and your program will continue to run.
When you submit a job to the batch queue, the system displays its name and status on your screen. A just-submitted job can have one of the following statuses:
You should use the batch queue when you want to run a program at a later time or when you want to run programs that accept the -BATch parameter in the background. Otherwise, add an ampersand (&) to the command line to place the program in the background to run immediately. For more information, see "Running Programs in the Background" in this chapter.
The Wisconsin Package provides the -BATch parameter for select programs to make it easy to submit programs to the default batch queue. As of Version 10.0, these programs are
| BLAST | FrameSearch | ProfileSearch |
| Coilscan | GCGtoBLAST | SSearch |
| Compare | GelMerge | StringSearch |
| FastA | MFold | TFastA |
| FastX | PAUPSearch | TFastX |
| FindPatterns | PileUp | WordSearch |
| FrameAlign | Prime |
GCG sets the -BATch parameter to execute a job as soon as possible. However, your system manager may have modified the -BATch parameter to execute jobs at a later time. See your system manager for more information.
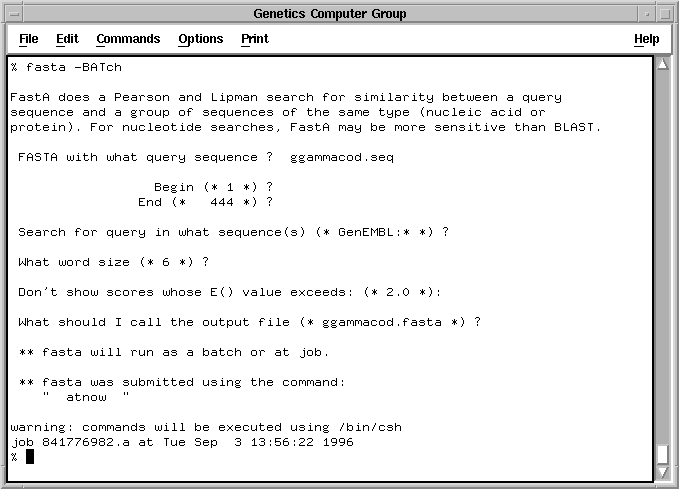
The following is a typical example of a program submitted to the batch queue using the -BATch parameter.
Note the system messages in the batch job example above:
** fasta will run as a batch or at job.
This Wisconsin Package message confirms that this program was submitted to the batch queue.
** fasta was submitted using the command:
"atnow".
This Wisconsin Package message identifies the UNIX command used to submit your program to the batch queue. If the command you see is different than the one in the example, your system manager has changed the -BATch parameter.
Note: Because you or your system manager are able to modify the command to submit jobs to batch, your message may read differently.
job smith.841776982.a at Mon Dec 2 13:56.22 1996
The system also displays a job number and date below the messages. The system assigns a unique number to each job submitted to the batch queue. To check on jobs in the batch queue, type % at -l. The system displays a list of jobs waiting to execute.
When you submit a job to the batch queue, the program creates two files in your current directory. Both files have the same base name (which is the name of the program), an underscore (_), and a unique number, for example fasta_30848_1. One of the two files has the extension ".init"; this file contains the parameters you are using to run the program. The other file, which has no extension, contains the shell script that runs the program. When your job completes, the system deletes both files from your directory unless you add -NODELete to the program command line.
After the job executes in the batch queue, the system sends an e-mail message notifying you that the job completed. This e-mail message contains the standard output and standard error, the messages normally displayed on your screen when you run the program interactively. If for some reason your batch job fails, you can examine the contents of this e-mail message to determine why.
You can find the results of your batch job in the output filename you specified. Unless you specify otherwise, the output file appears in the directory you were in when you submitted the program. If the batch job fails or is interrupted, the .init file and the file that has no extension may not be deleted. If this is the case, you can delete the files from the directory.
Some programs support the command-line parameter -BATch to submit themselves to the batch queue. For those programs that do not support -BATch, you can write shell scripts to submit them to the batch queue.
Choose from the following.
The system sends you a mail message when your batch job completes. You can find the output file in the directory you were in when you ran the batch job.
At some point in your work with submitting jobs to the batch queue, you may want to cancel an already submitted job. For instance, what if you submitted a FastA job to batch, but then realized you specified the wrong sequence? You can delete the job from the batch queue.
A batch job may fail for a number of reasons: perhaps you forgot to specify a value for a parameter that did not have a default, or the program stopped running because of memory problems, or maybe you provided a filename that did not exist, among other reasons.
There are two ways to troubleshoot a failed batch job. One way is to check the batch job's e-mail message. After the job executes in the batch queue, the system sends an e-mail message notifying you that the job completed. This e-mail message contains the standard output and standard error, the messages normally displayed on your screen when you run the program interactively. If for some reason your batch job fails, you can examine the contents of this e-mail message to determine why.
A second way to troubleshoot a failed batch job is to run the program again, sending the system and error messages to your screen while it runs. These messages may be more meaningful than the e-mail messages.
Note: If you are submitting a job to the batch queue using the -BATch parameter, do steps 1 and 2. If you are submitting a shell script to the batch queue, do only step 2.
This parameter prevents the batch program's shell script and .init file from being deleted after the program completes.
TIP - If your shell script runs correctly interactively but fails when you run it in batch, check that the Wisconsin Package is initialized in the script. For more information, see "Creating a Shell Script" in the "For Advanced Users" section of this chapter.
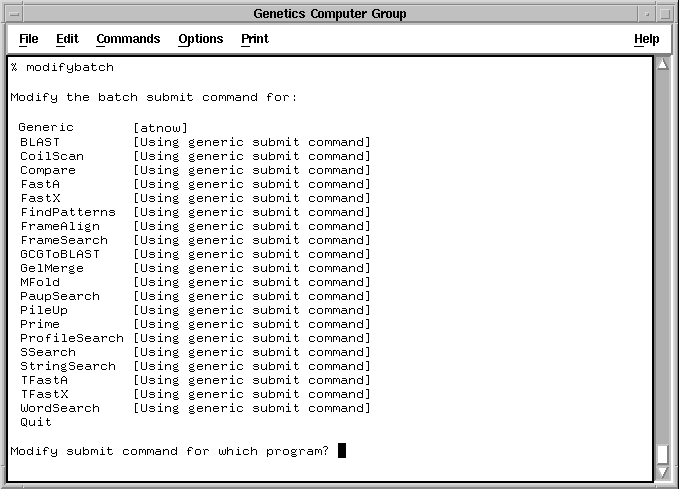
You can change the time a batch job runs with the ModifyBatch utility. ModifyBatch allows you to change the time for each separate program or for all programs that support the -BATch parameter. Your changes to batch stay in effect until you log off of the computer.
The screen again displays the programs supporting the -BATch parameter. The changes you have made to ModifyBatch appear in square brackets to the right of the program name.
TIP - If you run ModifyBatch each time you log in to the Wisconsin Package, you can define the commands in your login to automate the batch customization. To do so, type the answers to each prompt on a single line in your .gcgrc (csh) or .gcgrc.ksh (ksh) file. For example, to modify FastA to run at midnight in the batch queue, you could add the line modifybatch fasta midnight to the file. For more information about adding commands to your .gcgrc (csh) or .gcgrc.ksh (ksh) file, see "Working with Shell Scripts" in the "For Advanced Users" section of this chapter.
This section covers advanced tasks you may want to perform after you have become familiar with the basics of running Wisconsin Package programs. This section teaches you how to
A pipe (|) is a mechanism for running two programs from a single command line. One program generates output while the second program accepts that output as program input.
There are two kinds of pipes that you can use with the Wisconsin Package: shell pipes and Wisconsin Package pipes.
When a pipe character appears as part of the value of a command line parameter where a filename is expected, a Wisconsin Package pipe is used. In such a case, the pipe character must be enclosed in double quotation marks (") to prevent the shell from interpreting it. When you use an unquoted pipe character to redirect the standard output of a program, a shell pipe is used.
You can use only Wisconsin Package pipes from the program prompts. Whereas shell pipes can be used only to redirect standard output (or both standard error and standard output), you can use Wisconsin Package pipes in place of any output file. Shell pipes run both programs simultaneously; Wisconsin Package pipes run the two programs serially: first the program generating the output runs, then the program consuming the output.
The first example below uses shell pipes and the second uses Wisconsin Package pipes. In these examples both produce exactly the same output.
% lprint -d temp.txt -out=- | lpr
% lprint -d temp.txt -out="|lpr"
Notice that in the first example the Wisconsin Package program LPrint sends the output to standard output (-out=-). The shell uses the standard output of LPrint as the standard input to the program lpr.
In the second example, the Wisconsin Package program LPrint sends its output to the program lpr without the intervention of the shell. The output of LPrint is written to a temporary file. When the output is complete the program lpr runs with the temporary file. When the lpr program completes, the temporary file is deleted.
You typically direct where your program output goes; that is, you might direct output to a file, to your screen, or to a printer or plotter (see "Redirecting Program Output to a Device" in this chapter). You also can direct output from one program as input to another program. For example, the Compare program writes an output file that is input to the DotPlot program. To redirect the Compare output to the DotPlot program, you could type "| dotplot -Default" in response to the program prompt "What should I call the output file?" The | is a pipe that takes the output from the current program or command and passes it to a second command following the |. This second command and its parameters must suppress any interactive prompts. You must enclose the | and its following command in double quotation marks (").
Note that although piping the output from one program into another saves you some time, no output file is saved in the process.
Type "| program -Default" in response to the prompt "What should I call the output file?" To redirect output to another program using command-line control, add -OUT="| program -Default" to the command line.
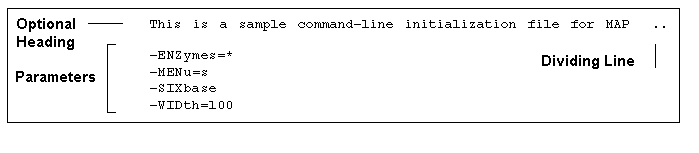
A command-line initialization file is a separate file in which you define parameters that you want to use consistently with a particular program. Let's say you consistently run the program Map with the parameters -ENZymes=* -MENu=s -SIXbase -WIDth=100. Instead of typing those parameters each time you run the Map program, you can type them once in a command-line initialization file.
All Wisconsin Package programs that have command-line control let you define parameters in command-line initialization files. You can type parameters on the command line to override those defined within the command-line initialization file.
Command-line initialization files are advantageous if you want to ensure that you consistently run a program with the same parameters each time. They are especially appropriate to use when you have a number of parameters you want to consistently use. Another advantage is that, because a command-line initialization file is simply a file, you can modify it with a text editor.
Note: If you have a limited number of parameters you want to use, you may want to consider defining them in an alias. For more information, see "Using Aliases" in the "For Advanced Users" section of this chapter.
Below is an example of a command-line initialization file for the Map program.
If you save the file with the name of the program and the extension .init, for example map.init, the corresponding program automatically will use the file each time you run the program from that directory. If you do not want to use the initialization file every time you use the program, save the file with a different name.
You can name command-line initialization files so that programs automatically use them each time they run, or you can manually specify the initialization file on the command line when you run the program. Note that in either case, you can override a parameter you specified within the initialization file by adding that parameter and its new value to the command line. Command-line parameters always override parameters defined within a command-line initialization file.
Choose from the following.
Note: You must run the program from the directory containing the .init file for the program to automatically use it.
An alias is a shorthand shell command that you define. For instance, let's say you switch between two graphics devices frequently. Each time you switch to a different device, you must redefine your graphics configuration. Instead of running through the graphics configuration commands each time, however, you can define an alias symbol for each device. Then, to switch between devices, you only have to type the alias instead of running through the entire graphics configuration command set up. (For more information on graphics devices, see Chapter 5, Using Graphics.)
You can type parameters on the command line to override those defined within the alias.
Defining aliases is advantageous if you want to define a shorthand abbreviation for a command and its parameters. They also ensure that you consistently run a program with the same parameters each time. Aliases are especially appropriate to use when you have a limited number of parameters you want to consistently use.
Note: When you have many parameters you want to use with a command, define them in a command-line initialization file.
(csh)
% alias lw postscript laserwriter /dev/tty15
% alias tk tektronix tek4207 Term
(ksh)
% alias lw="postscript laserwriter /dev/tty15"
% alias tk="tektronix tek4207 term"
Note: Make sure the .gcgrc (csh) or .gcgrc.ksh (ksh) file is located in your top directory.
If the alias does not run as you expect it to, edit the file as necessary and test it again.
Type the symbol you defined, for example % lw. The program or command runs with the parameters you specified.
A shell script is a file that contains UNIX or program commands. It mimics exactly what you would type if you ran the commands interactively. You can use a shell script to execute commands and set up aliases when you log in to the system. For example, your .login (csh) or .profile (ksh) file is a shell script. You also can create shell scripts to submit programs that do not support the -BATch parameter to the batch queue.
Shell scripts are advantageous for customizing your login environment. For instance, in your .login (csh) or .profile (ksh) file you can define that the Wisconsin Package is automatically initialized, your graphics configuration is initialized, and your MyData logical name is defined each time you log in. Shell scripts are also useful when you want to submit programs that do not support the -BATch parameter to the batch queue.
(csh)
(ksh)
Note: GCG has provided a number of example shell scripts in the directory with the logical name genscriptfiles. Use the Fetch program to copy one to your directory, open it in a text editor, then modify it to suit your needs.
Keep the following guidelines in mind as you create shell scripts:
Note: This shell does not have to be the same as the shell you use to log in.
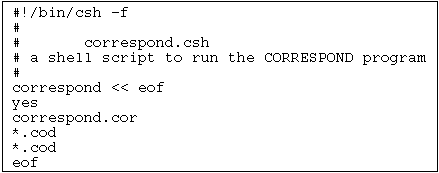
Note: The << tells the shell script to use the information between the two names, in this case eof, as responses to the program prompts.
Testing a shell script until it works correctly will prevent you from using excess CPU time on one that doesn't work.
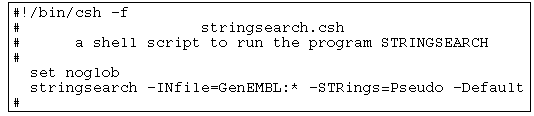
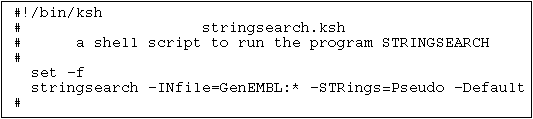
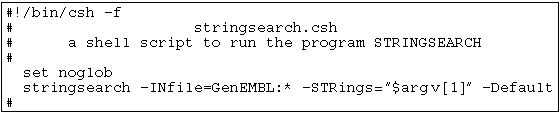
TIP - A shell script must include all required parameters to suppress program prompts. You may want to create a shell script, however, in which you can change a parameter from the command line. For example, you may want to change the input file for a program but use the same parameters. To do so, use the $argv[number] (csh) or $number (ksh) shell variable to pass parameters to the shell script. Consider the shell script examples below.
(csh)
(ksh)
To run the shell script, type % ./stringsearch.csh parameter (csh) or % ./stringsearch.ksh parameter (ksh) where parameter is the replacement for the shell variable you used. For example, % ./stringsearch.csh pseudo replaces "$argv[1]" (csh) or "$1" (ksh) and searches for the string "pseudo" in the GenEMBL database.
Choose from the following.
Note: Check with your system manager to see if this option is supported at your site.
Your system manager may have specific queues set up to run batch jobs. Ask him/her for assistance in submitting a shell script to the batch queue.
[ Program Manual | User's Guide | Data Files | Databases ]
Documentation Comments: doc-comments@gcg.com
Technical Support: help@gcg.com
Copyright (c) 1982, 1983, 1985, 1986, 1987, 1989, 1991, 1994, 1995, 1996, 1997, 1998 Genetics Computer Group Inc., a wholly owned subsidiary of Oxford Molecular Group, Inc. All rights reserved.
Licenses and Trademarks Wisconsin Package is a trademark of Genetics Computer Group, Inc. GCG and the GCG logo are registered trademarks of Genetics Computer Group, Inc.
All other product names mentioned in this documentation may be trademarks, and if so, are trademarks or registered trademarks of their respective holders and are used in this documentation for identification purposes only.